Appearance
lit-html の素振り
2021-04-30
lit-html に入門して簡単にですが素振りをしたのでまとめます。
ここの周りはGW明けまでにしっかりまとめます。Web Components 周りとの連携や haunted を使った状態管理などを行うつもり。
lit-html とは
lit-html とは、Polymer が提供している "HTML in JS" を実現するためのライブラリです。
Polymer には Polymer Core という機能がありますが、Polymer Core は、素の Web Components で真面目にやると発狂してしまいそうな作成の手順を簡略化し、テンプレート機能やデータバインディングといった、Web Components を作る上で土台となる機能を提供してくれています。
少し話題が逸れましたが、lit-html は string の html を JS として扱い振舞うことができる "HTML in JS" なライブラリだと思ってもらえれば良いかなと思います。
hello world
公式では es-dev-server についての記述がありましたが今回は vite を使用していきます。
package.json, index.html, index.js をそれぞれ定義していきます。
// package.json
{
  "name": "lit-html_suburi",
  "version": "0.0.0",
  "scripts": {
    "dev": "vite",
    "build": "vite build",
    "serve": "vite preview"
  },
  "devDependencies": {
    "vite": "^2.2.3"
  },
  "dependencies": {
    "lit-html": "^1.3.0"
  }
}
1
2
3
4
5
6
7
8
9
10
11
12
13
14
15
16
2
3
4
5
6
7
8
9
10
11
12
13
14
15
16
<!-- index.html -->
<!DOCTYPE html>
<html lang="en">
  <head>
    <meta charset="UTF-8" />
    <link rel="stylesheet" href="style.css">
    <meta name="viewport" content="width=device-width, initial-scale=1.0" />
    <title>lit-html hello world</title>
  </head>
  <body>
    <script type="module" src="./index.js"></script>
  </body>
</html>
1
2
3
4
5
6
7
8
9
10
11
12
13
2
3
4
5
6
7
8
9
10
11
12
13
// index.js
import { html, render } from 'lit-html';

const app = html`<h1>hello world</h1>`;
render(app, document.body);
1
2
3
4
5
2
3
4
5
これでとりあえず hello world はできます。ターミナルで以下を叩きます。
npm i
npm run dev
1
2
2
ブラウザにアクセスします。build などは不要です。
仕組み
簡単にお作法についてです。
html について
html はその中に囲ったものを html として表現することができます。
コードで言うと ここ です。
タグテンプレートとして使用する構成になっています。下にある svg も同じ構成になっています。
html タグテンプレートでは JSX と違い、1つの要素で構成されている必要はありません。
// これでも問題なし
const app = html`
<div>hello world</div>
<div>hello takurinton</div>
`;
1
2
3
4
5
2
3
4
5
イベントを埋め込むこともできます。
const listener = {
  handleEvent(e) {
    alert('hello world');
  },
};

const buttonComponent = html`<button @click=${listener}>Click Me</button>`
1
2
3
4
5
6
7
2
3
4
5
6
7
合わせ技もできます。
const takurinton = html`<h1>hello takurinton</h1>`;
const hoge = html`<h1>hello hoge</h1>`;

const app = html`
${takurinton}
${hoge}
`;
1
2
3
4
5
6
7
2
3
4
5
6
7
引数を渡すこともできます。
const name = 'takurinton';
const app = (name) => html`<h1>hello ${name}</h1>`;
1
2
2
ループも回せます。
const items = ['takurinton', 'hoge', 'fuga'];
const itemsComponent = html`
  <ul>
    ${items.map(item => html`<li><h2>name: ${item}</h2></li>`))}
  </ul>
`;
1
2
3
4
5
6
2
3
4
5
6
JS だったら三項演算子でチャチャっとやること多そう。
const isUser = html`
  ${user.isloggedIn ?
    html`<h1>Welcome ${user.name}</h1>` :
    html`<h1>Please log in</h1>`
  }
`;
1
2
3
4
5
6
2
3
4
5
6
render について
render は感覚で言うと ReactDOM.render に近いです。
第一引数にレンダリングしたい要素、第二引数に target、第三引数にはオプションを指定することができます。
コードで言うと ここらへん になります。
上で定義したコンポーネントを埋め込むことでレンダリングしてくれます。
const app = html`<div>hello world</h1>`;
render(app, document.body);
1
2
2
これで画面に描画してくれます。
提供されてる機能
上で簡単に書いたお作法と被ってないものを紹介していきます。
ドキュメント に書いてあるものを手元で動かしてなぞっていきます。
また、lit-html では directive がよく使われます。これから紹介するものも directive の一部です。
repeat
repeat を使用すると Array.map を使用したときに比べてレンダリングを制御することができます。
通常、Array.map を使用すると効率的にループを回すことができますがそれよりも効率的になるようです。
ドキュメントには以下のように書いてあります。
TIP
- For a list created using Array.map, lit-html maintains the DOM nodes for the list items, but reassigns the values.
- For a list created using repeat, the repeat directive reorders the existing DOM nodes, so the nodes representing the first list item move to the last position.
これ見る感じだと普通に JS のノードの更新か DOM のツリーの更新か、どちらが速いかなあってことを比較してやったほうが良さそうですね。なんか時と場合によって違いそう。ここらへんの言語自体への知見がないのでなんとも言えませんが、気になるならベンチマークとって確かめたほうが良さそうな感じがします。あとでやっとく。
import {repeat} from 'lit-html/directives/repeat.js';

const items = [
    {
        id: 1,
        name: 'takurinton'
    },
    {
        id: 2,
        name: 'hogehoge'
    },
    {
        id: 3,
        name: 'fugafuga'
    }
];

const itemsComponent = (items) => html`
  <ul>
    ${repeat(items, (item) => item.id, (item, index) => html`
      <li>${index}: ${item.name}</li>
    `)}
  </ul>
`;
1
2
3
4
5
6
7
8
9
10
11
12
13
14
15
16
17
18
19
20
21
22
23
24
2
3
4
5
6
7
8
9
10
11
12
13
14
15
16
17
18
19
20
21
22
23
24
rendering nothing
何もレンダリングしたくない時に nothing が便利です。
undefined や null、または空文字を渡しても良いですが、それは lit-html では空のノードがレンダリングされるという扱いになります。
${user.isAdmin ?
    html`<button>DELETE</button>` :
    ''
}
1
2
3
4
2
3
4
空のノードすらレンダリングしたくない場合は nothing を使用します。
import { nothing } from 'lit-html';

${user.isAdmin ?
    html`<button>DELETE</button>` :
    nothing
}
1
2
3
4
5
6
2
3
4
5
6
ただ、こいつは shadow DOM の中で <slot> を使っていると嬉しくないかもしれません。
shadow DOM についてはほんの少しだけ Web Components の記事 で触れています。
// こういうのがあって
html`<slot>Sorry, no content available. I am just fallback content</slot>`;

// ここで実装したい
import {nothing, html} from 'lit-html';
html`
<example-element>
${user.isAdmin?
    html`<button>DELETE</button>` :
    nothing
}
</example-element>
`;
1
2
3
4
5
6
7
8
9
10
11
12
13
2
3
4
5
6
7
8
9
10
11
12
13
これをするとユーザーが管理者の時に DELETEボタン を表示し、管理者ではないときに何も表示しないことを実現したいのですが、実際には nothing は何もレンダリングしないため Sorry, no content available. I am just fallback content が表示されてしまいます。
そんな時には以下のような感じにします。
// 空白を開けるとそれは fallback 扱い
html`
<example-element> ${nothing} </example-element>
`;

// 改行もまた fallback 扱い
html`
<example-element>
${nothing}
</example-element>
`;
1
2
3
4
5
6
7
8
9
10
11
2
3
4
5
6
7
8
9
10
11
キャッシュ
レンダリングした結果をキャッシュすることもできます。
主に条件付きのレンダリングで使用することができ、現在レンダリングされていないテンプレートの DOM をキャッシュすることができます。
import {cache} from 'lit-html/directives/cache.js';

const Admin = (data) => html`<div>admin: ${data}</div>`;
const Nomal = (data) => html`<div>user: ${data}</div>`;

html`${cache(data.isAdmin ?
    Admin(data) :
    Nomal(data)
)}`
1
2
3
4
5
6
7
8
9
2
3
4
5
6
7
8
9
この場合、Admin と Nomal の両方がキャッシュされます。
あるビューから別のビューに切り替える場合、lit-html は、キャッシュされたバージョンの新しいビューをスワップインし最新のデータで更新する必要があります。
classMap/styleMap
classMap と styleMap はそれぞれスタイリングをするためのものです。それぞれ似ていますが以下の特徴を持ちます。
- classMap
- オブジェクトのプロパティに基づいて要素にクラスを設定します
- styleMap
- スタイルのプロパティと値のマップに基づいて要素にスタイルを設定します
要はクラスを渡したいときは classMap、スタイルごと渡したいときは styleMap ということです(小泉進次郎みがでてる)
以下のような形で使用します。
// classMap
import { classMap } from 'lit-html/directives/class-map.js';

const itemTemplate = item => {
  const classes = { selected: item.selected } ;
  return html`<div class="menu-item ${classMap(classes)}">Classy text</div>`;
}
1
2
3
4
5
6
7
2
3
4
5
6
7
// styleMap
import { styleMap } from 'lit-html/directives/style-map.js';
import { classes } from './style.css.ts';

const myTemplate = () => {
  styles = {
    color: classes.color,
    backgroundColor: highlight ? classes.noon : classes.night,
  };

  return html`
    <div style=${styleMap(styles)}>
      Hi there!
    </div>
  `;
};
1
2
3
4
5
6
7
8
9
10
11
12
13
14
15
16
2
3
4
5
6
7
8
9
10
11
12
13
14
15
16
もちろん、html の中に style タグを定義して実装することもできます。これは shadow DOM を使用する際などに使うことが多い?かもしれません。
また、変数なども使用できるので良さそうです。
const themeColor = 'red';
const element = html`
<style>
:host {
    ...
}
.text {
    font-size: 5rem;
    color: ${themeColor};
}
</style>

<h1 class="text">hello world</h1>
`;
1
2
3
4
5
6
7
8
9
10
11
12
13
14
2
3
4
5
6
7
8
9
10
11
12
13
14
shadow DOM をデフォルトで実装していないブラウザもありますが、そのような時には shadyCSS という polyfill の役割をしてくれるものもあるのでそちらを参照すると良さそうです。
レンダリング
lit-html では Template(コンポーネント)の型は TemplateResult として扱われます。lit-html では DOM が更新されたときに何もしないと再レンダリングはしてくれません。再レンダリングするには TemplateResult を再度 render() 関数に渡す必要があります。
import {html, render} from 'lit-html';

const hello = (name) => html`<h1>Hello ${name}</h1>`;
render(hello('takurinton'), document.body);

// 更新するには同じことをしないといけない。
render(hello('hogerinton'), document.body);
1
2
3
4
5
6
7
2
3
4
5
6
7
また、上で少し触れましたが、render() 関数にはオプションを渡すことができます。
オプションには以下の2つがあります。
- eventContext
- @eventName で登録したイベントを呼び出すときに使用する
- templateFactory
- TemplateResult からテンプレート要素を作成する
- 通常は静的コンテンツに基づいてテンプレートをキャッシュする
このような形でオプションは使用することができます。
class MyComponent extends HTMLElement {
  // ...

  _update() {
    // イベントリスナーを受け取り MyComponent にバインドすることができる
    render(this._template(), this._renderRoot, {eventContext: this});
  }
}
1
2
3
4
5
6
7
8
2
3
4
5
6
7
8
directive を作成する
lit-html には directives という強力な機能があります。
directives は lit-html がコンポーネントをレンダリングする際にその方法をカスタマイズすることができる機能です。
ただし、directives は、レンダリングする値を返す代わりに、DOM 内のその場所にレンダリングされるものを制御します。
例えば以下の例は Part インターフェースを使用して、バインディングに関連付けられた動的 DOM を表すコードです。
import { directive } from 'lit-html';
const helloDirective = directive(() => (part) => { part.setValue('Hello')});
const app = html`<div>${helloDirective()}</div>`

render(app, document.body);
1
2
3
4
5
2
3
4
5
返される値は同じですが、これはパーツがレンダリングされるたびに呼び出されます。
part 引数は、式に関連付けられた動的DOMを直接管理するためのAPIを備えたPartオブジェクトです。各タイプのバインディングには、固有のPartオブジェクトがあります。
- NodePart
- コンテンツのバインディング
- AttributePart
- 標準の属性バインディング
- BooleanAttributePart
- boolean の属性バインディング
- EventPart
- イベントのバインディング
- PropertyPart
- プロパティのバインディング
また、それぞれには以下のプロパティをつけることができます。
- value
- part に現在の値を付与する
- setValue
- part に新しい値を付与する
- commit
- 保留中の値を DOM に書き込む
- 非同期 directive (後から出てくる)などの高度なユースケースにのみ必要で、通常は自動で行われる
以下は directives を安全に作成する例です。
// これが directive
const safe = directive((f) => (part) => {
  try {
    part.setValue(f());
  } catch (e) {
    console.error(e);
  }
});
1
2
3
4
5
6
7
8
2
3
4
5
6
7
8
これはよく見るカウンターです。
// これが directive
const counter = directive((initialValue) => (part) =>
  part.setValue(part.value === undefined ? initialValue : part.value+1);
);

const template = html`
  <div>
   <!-- ここで使用する、返す値は動的な DOM -->
    ${counter(0)}
  </div>`;
1
2
3
4
5
6
7
8
9
10
2
3
4
5
6
7
8
9
10
非同期の directives
directives には非同期で動作するものもあります。
async directives はレンダリングプロセス中に呼び出されます。先ほどの例は同期的に処理されます。
fetch API を使用してる場合などの非同期でイベントを処理したいなど、directives で DOM を非同期に更新できるようにしたい時があります。
directives を使用して非同期処理を行う場合、更新された値を DOM に書き込むために、part の commit() 関数を呼び出す必要があります。
以下はその例です。
const resolvePromise = directive((promise) => (part) => {
  part.setValue("hello world");

  Promise.resolve(promise).then((resolvedValue) => {
    part.setValue(resolvedValue);
    // ここでコミットする
    part.commit();
  });
});
1
2
3
4
5
6
7
8
9
2
3
4
5
6
7
8
9
よく見るやつだけど、1秒ごとにカウントしていくやつです。使用中の directive を処理する方法です。
const counter = new Promise((resolve, reject) => {
  setTimeout(() => {
    resolve("resolved.");
  }, 1000);
});

const template = html`<div>${resolvePromise(counter)}</div>`;
1
2
3
4
5
6
7
2
3
4
5
6
7
レンダリング間の state の維持
directive がレンダリング間で state を維持する必要がある場合があるとします。
結論から言うと、DOM 内の特定の場所を表す Part オブジェクトが、レンダリングの呼び出し間で同じままであるということから可能です。
import { directive } from 'lit-html';

const stateMap = new WeakMap();

const statefulDirective = directive(() => (part) => {
  let myState = stateMap.get(part);
  if (myState === undefined) {
    // 初期値
    myState = {};
    stateMap.set(part, myState);

    // ここで更新をする
    // ...
  }
});
1
2
3
4
5
6
7
8
9
10
11
12
13
14
15
2
3
4
5
6
7
8
9
10
11
12
13
14
15
WeakMap についてですが、これはキーが弱く参照されるキーと値の組のコレクションです(?)
WeakMap のキーはオブジェクトである必要があります。(上の例では part オブジェクトを渡している)
使用方法は普通の map オブジェクトと同様です。(web の API の有名どころだと localStorage とか???)
弱い参照とは何?って感じですが、メモリリーク対策のために参照を弱くすることでキーとなったオブジェクトへの参照が他に存在しない場合に GC の対象にしてくれます。しかし、弱い参照を用いるため、WeakMap のキーの一覧は列挙することができません。そこだけ注意する必要がありそうです。
※なんか MDN に .clear() メソッドを持つ WeakMap 風クラスの実装とかいうのがあった
class ClearableWeakMap {
  constructor(init) {
    this._wm = new WeakMap(init);
  }
  // これか、新しい WeakMap を作成することで初期化してるのか
  clear() {
    this._wm = new WeakMap();
  }
  delete(k) {
    return this._wm.delete(k);
  }
  get(k) {
    return this._wm.get(k);
  }
  has(k) {
    return this._wm.has(k);
  }
  set(k, v) {
    this._wm.set(k, v);
    return this;
  }
}
1
2
3
4
5
6
7
8
9
10
11
12
13
14
15
16
17
18
19
20
21
22
2
3
4
5
6
7
8
9
10
11
12
13
14
15
16
17
18
19
20
21
22
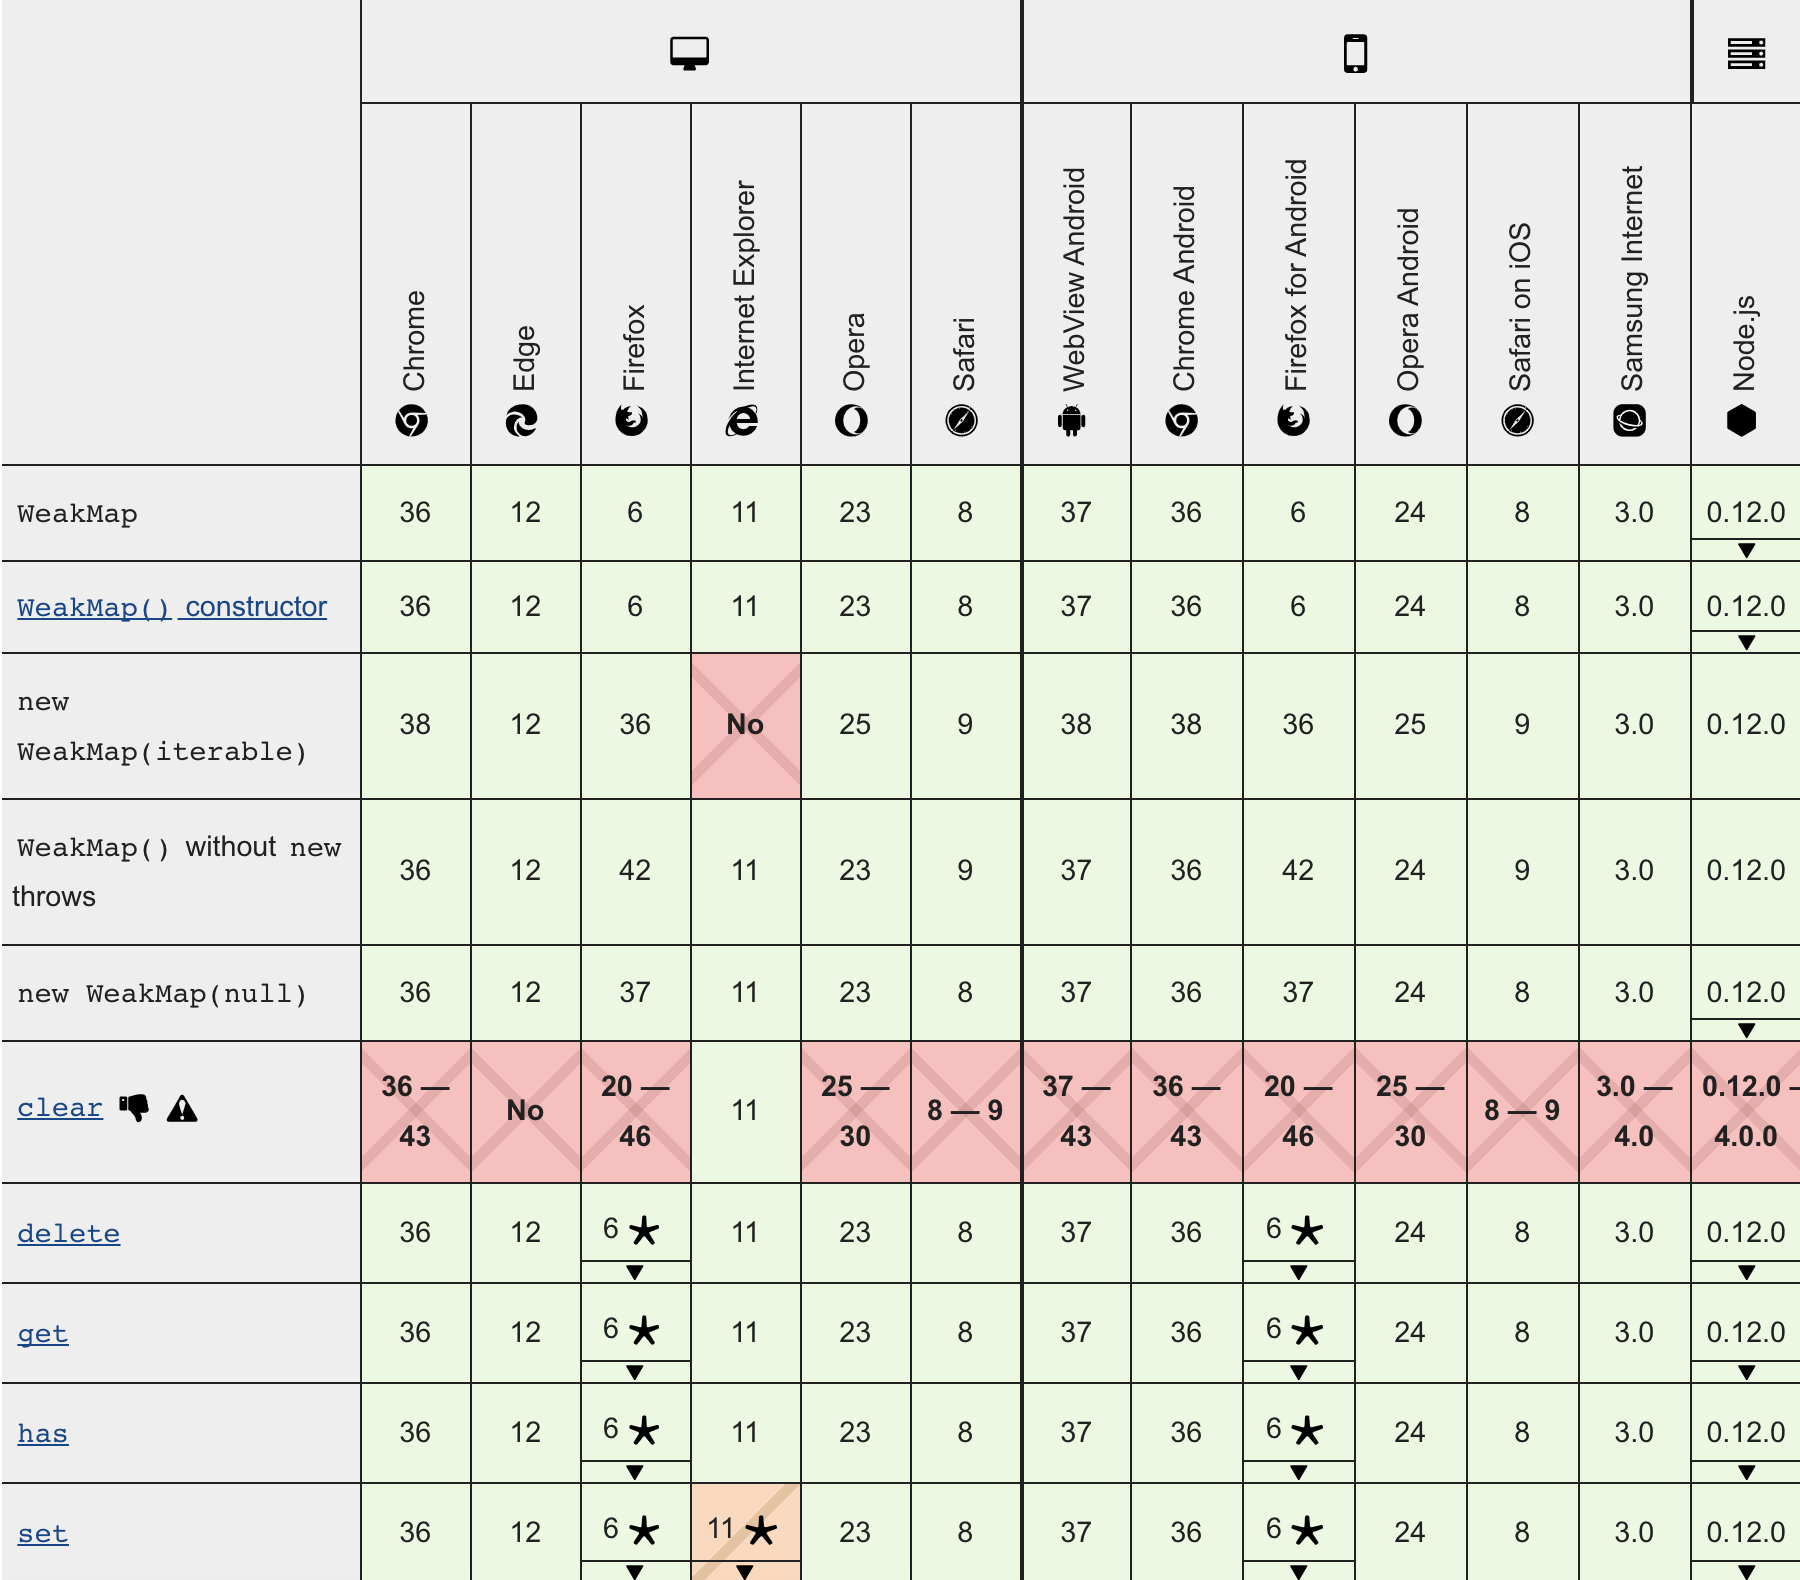
対応状況はこれ、はいクソ()
複数のネストされた Part を処理するには
複数のネストされたパーツを管理する directive が必要な場合があります。
例えばループを回す際には item を1つずつ処理する必要が出てきます。そのような時に別々のパーツを保持すると効率的に操作でき、全体を再レンダリングすることなく特定の Part を更新することができます。
ネストされた Part を作成するには、NodePart インスタンスを作成し、DOM 内の任意の場所に紐付けます。
特定の NodePart によって制御される DOM のセクションは、マーカーとして機能する静的ノードで区切る必要があります。(ライフサイクルの図は 公式サイト の図を参照した方がわかりやすいかと思います)
import { NodePart } from 'lit-html';
const newPart = new NodePart(containerPart.options);

newPart.appendIntoPart(containerPart);
1
2
3
4
2
3
4
appendIntoPart 関数はマーカーノードを作成し、ネストされた Part を挿入します。NodePart はそれだけで技術メモ1本書けてしまいそうなくらい機能があるので後日記事にします(`・∀・´)
まとめ
ここまで駆け足でざっと構文やら機能やらを紹介(というより自分がドキュメント読んでみてのおさらい?)をしてきましたが、Web Components との相性や style の適用に関してなどとても自分好みでやりやすいように感じました。
間違ってるポイントなどがあったら PR ください。
また、lit-html に限らず lit や lit-element などがあるのでそこらへんもざっと見ていきたいと思います。