Appearance
Web Components と React
2022-01-18
ブログを作り直している。その過程で、web components を入れてみてプロダクション導入できるかどうか、もし入れるならどういう用途なのか、SSR をする前提で考えた時どうか、などの肌感を確かめながら試したのでメモにする。
そもそも、web components とは何かという人は、過去に Web Components について というメモを書いているのでそちらを見て欲しい。(何より見るべきは MDN だけど)
React で使うには
React で web components は非常に簡単に導入することができるが、いくつか注意が必要。
まず、React のレンダリングツリーはブラウザ互換がないので、hooks などでイベントを付与することはできない。(Preact であれば利用可能)
また、shadow root も、ref を使用して attach しなければならない。
例えば、以下のようなコンポーネントを定義する。
const fontSize = {
  h1: "2rem",
  h2: "1.6rem",
  h3: "1.2rem",
  p: "1rem",
};

export class Typography extends HTMLElement {
  constructor() {
    super();
    const tag = this.getAttribute("tag");
    const shadow = document.createElement(tag);
    const weight = this.getAttribute("weight");
    const text = this.getAttribute("text");

    shadow.innerHTML = `
            <style>
                ${tag} {
                    font-size: ${fontSize[tag]};
                    color: #222222;
                    font-weight: ${weight === "bold" ? 800 : 200};
                }
            </style>

            ${text}
        `;

    this.attachShadow({ mode: "open" }).appendChild(shadow);
  }
}

customElement.define("x-typography", Typography);
1
2
3
4
5
6
7
8
9
10
11
12
13
14
15
16
17
18
19
20
21
22
23
24
25
26
27
28
29
30
31
32
2
3
4
5
6
7
8
9
10
11
12
13
14
15
16
17
18
19
20
21
22
23
24
25
26
27
28
29
30
31
32
これは、タグ名と文字列と太さを引数に取る Typography コンポーネントだ。html で利用しようとするとこうなる。
<x-typography tag="h1" text="takurinton" weight="bold">
  <span slot="x-typography">takurinton</span>
</x-typography>
1
2
3
2
3
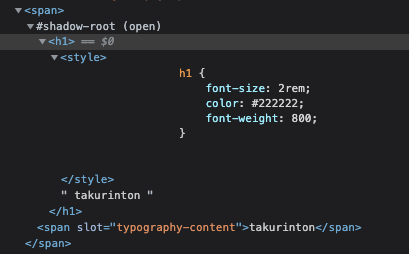
これは、以下のようにレンダリングされる。

shadow root の中にツリーが展開されていることがわかる。
それでは、これを React で利用するとどうなるか。
おそらく、普通にこう使いたくなる。
const App = () => {
  return (
    <div>
      <x-typography tag="h1" text="takurinton" weight="bold">
        <span slot="x-typography">takurinton</span>
      </x-typography>
    </div>
  );
};
1
2
3
4
5
6
7
8
9
2
3
4
5
6
7
8
9
しかし、これだとレンダリングされない。
React のツリーと web components のエントリポイントに関連がないからだ。このような時は、ref を使用してあげる必要がある。
やるならこんな感じか。
const App = () => {
  const ref = useRef<HTMLSpanElement>(null);

  useEffect(() => {
    const tag = this.getAttribute("tag");
    const shadow = document.createElement(tag);
    const weight = this.getAttribute("weight");
    const text = this.getAttribute("text");

    shadow.innerHTML = `
            <style>
                ${tag} {
                    font-size: ${fontSize[tag]};
                    color: #222222;
                    font-weight: ${weight === "bold" ? 800 : 200};
                }
            </style>

            ${text}
        `;

    ref.attachShadow({ mode: "open" }).appendChild(shadow);
  }, []);

  return <span ref={ref}></span>;
};
1
2
3
4
5
6
7
8
9
10
11
12
13
14
15
16
17
18
19
20
21
22
23
24
25
26
2
3
4
5
6
7
8
9
10
11
12
13
14
15
16
17
18
19
20
21
22
23
24
25
26
ref を使用して、React のツリーに attach する必要がある。
また、これでは useEffect の中が長くなりすぎる場合は、以下のようにラップするような関数を作ってみてもいい。
import React, { forwardRef, useRef, useEffect } from "react";

const fontSize = {
  h1: "2rem",
  h2: "1.6rem",
  h3: "1.2rem",
  p: "1rem",
};

type TypographyProps = {
  tag: "h1" | "h2" | "h3" | "p";
  weight?: "bold" | "normal";
  text: string;
};

export const TypographyWrapper: React.FC<TypographyProps> = ({
  tag,
  weight = "normal",
  text,
}) => {
  const typographyRef = useRef<HTMLHeadingElement>(null);

  useEffect(() => {
    const shadow = document.createElement(tag);
    shadow.innerHTML = `
            <style>
                ${tag} {
                    font-size: ${fontSize[tag]};
                    color: #222222;
                    font-weight: ${weight === "bold" ? 800 : 200};
                }
            </style>

            ${text}
        `;

    typographyRef.current?.attachShadow({ mode: "open" }).appendChild(shadow);
  }, []);

  return (
    <span ref={typographyRef}>
      <span slot="typography-content">{text}</span>
    </span>
  );
};
1
2
3
4
5
6
7
8
9
10
11
12
13
14
15
16
17
18
19
20
21
22
23
24
25
26
27
28
29
30
31
32
33
34
35
36
37
38
39
40
41
42
43
44
45
2
3
4
5
6
7
8
9
10
11
12
13
14
15
16
17
18
19
20
21
22
23
24
25
26
27
28
29
30
31
32
33
34
35
36
37
38
39
40
41
42
43
44
45
これで、同じ引数でコンポーネントを利用することができるようになった。
<Typography tag="h1" text="takurinton" weight="bold" />
1
また、shadow root に React のコンポーネントを attach することはできる。mountPoint を shadow root に attach して、それを render 関数で shadow root 内に展開している。
class XSearch extends HTMLElement {
  connectedCallback() {
    const text = this.getAttribute("text");
    const mountPoint = document.createElement("span");
    this.attachShadow({ mode: "open" }).appendChild(mountPoint);

    ReactDOM.render(<h1>{text}</h1>, mountPoint);
  }
}
1
2
3
4
5
6
7
8
9
2
3
4
5
6
7
8
9
タグリテラルで書きたい
lit-html というものがある。
html タグリテラルにコードを書くと、それを shadow dom としてレンダリングしてくれる。
以下のような感じ。
import { html, render } from "lit-html";

const app = html`<h1>hello world</h1>`;
render(app, document.body);
1
2
3
4
2
3
4
通常の web components の定義だと、どうしても命令的な書き方になってしまうケースが多いが、これだと宣言的に書くことができる。
また、lit 用に React hooks と同じ syntax で状態を管理することができるようになった haunted というライブラリがある。
React と全く同じで使いやすい。メモ化や最適化を行うような関数たちもいるので面白い。ref の参照もできる。
import { html } from "lit-element";
import { component, useState } from "haunted";

export const Counter = () => {
  const [count, setCount] = useState<number>(0);
  const handleCount = useCallback(() => {
    setCount((c) => c + 1);
  }, [count]);

  return html`
    <div id="count">${count}</div>
    <button type="button" @click=${handleCount}>count up!!!</button>
  `;
};

customElements.define("counter-component", component(Counter));
1
2
3
4
5
6
7
8
9
10
11
12
13
14
15
16
2
3
4
5
6
7
8
9
10
11
12
13
14
15
16
SSR
自分のブログは SSR をしている。
そのため、初期レンダリングの時点で web component でレンダリングする要素は登場していて欲しいが、普通にタグを書くだけだとレンダリングされないので slot を使う。
上で出てきた x-typography というコンポーネントを定義した時、中に span slot="x-typography">takurinton</span> という記述をした。
<x-typography tag="h1" text="takurinton" weight="bold">
  <span slot="x-typography">takurinton</span>
</x-typography>
1
2
3
2
3
これをすることにより、x-typography が読まれるまで slot で指定した要素を表示してくれる。
また、SSR 時には、custom element の内側に要素が存在している場合には初回のレンダリングをしないような対応することで、レンダリングした html を無駄にせずに hydration が可能になる。
これは、Web Components を SSR する方法 で書いてあった。賢い...。
また、stencil は、LightDOM の展開と hydration を提供してくれているので、ここらへんを使えば SSR も可能になる。
現状、自分のブログは html がレンダリングされてから web components が define されるまでに虚無の時間が発生しているので、ここらへんで頑張って互換をとっていきたい。
実践的に使えるか
プロダクション導入に関してだと、自分の知識と力量だと少し厳しい気がしたけど、できるとは思う。(今そういうコードを書いていないので実感がないというのはある)
将来的に、ブラウザの標準に搭載されていて、モダンブラウザでは使える web components は、React や Vue で身につけた平成・令和のエンジニアたちのコンポーネント指向という概念をそのまま継承している。
個人的には、既存の React や Vue などのライブラリを使い状態の管理を行い、見た目は web components で作ることにより、より変化に強いフロントエンドが出来上がるのではないかなと考えている。 web components 自体は新しい概念ではないし、導入している事例はいくつか見たり聞いたりしている。
これからの web components に対しての世間の見解に注目していきたい。